Skeletal meshes. Maya to UnrealEd
Article by [furrycat].
Exporting the model
Epic's ActorX plugin is used to export the mesh (into a PSK file) and animation data (into a PSA file). ActorX is designed to share a common interface across the Maya and 3D Studio MAX plugins so MAX users can follow along too.

The first step is to invoke the ActorX control panel by typing axmain into the Command Line. ActorX pops up the rather ... large ... window on the left. It looks like there's a lot going on here but in fact it's quite simple. Just work your way down and it should all make sense.
Before doing anything you should click Scene Info. ActorX then processes some data about the scene including the number of meshes and joints. It will get upset if you change any of this later, so run Scene Info if you get errors after editing the scene.
Next choose the destination directory for the PSK and PSA files. Enter your choice under output folder or click Browse.
The next step is to choose a name for the mesh. The mesh will be saved into a PSK file which you will later import into the editor. After that it can be safely deleted. For this reason the choice of name is fairly arbitrary, though you will have to live with it as it will be saved in the editor. I entered ClockMesh under mesh file name.
Clicking Save mesh/refpose should now save ClockMesh.PSK in the output directory you chose above. Now we need to save some animations.
As with the mesh name, animation file name is up to you. ClockAnimation is as good a name as any.
Don't click Digest animation just yet. You have to enter the animation name and range first.
Now we come to the animation sequence name. ActorX will let you save any number of animations from a scene, using some or all of the frames in the animation. Usually the choice of name is entirely up to you. However for the purposes of this tutorial you MUST enter StandNoGun_nt. The reason for this will become clear later.
My animation has 61 frames so I entered 1-61 in the animation range box. Enter the right number of frames for your animation.
Now you are ready to digest the animation. Clicking Digest
animation tells ActorX to "digest" the animation and
prepare it for export. And how do we export? The next button down is
Animation manager so let's try that...
The animation manager

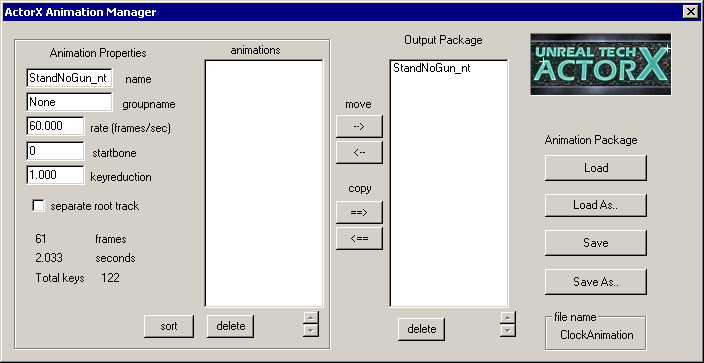
The lefthand side of the animation manager shows the animations you have digested and the righthand side shows the animations in the PSA package you are working with. Since we don't have a PSA package, this list will initially be empty. Click StandNoGun_nt in the list on the left and click the arrow to move the animation into the package. Then click Save to save it.
Conclusion
At the end of all this you should have ClockMesh.PSK and ClockAnimation.PSA in your output directory. If something went wrong or you don't have Maya, download the files here: clockexport.zip. From now on everything will be handled in UnrealEd.
Jump to a section
intro | part 1: Creating a mesh | part 2: Exporting the model | part 3: Creating a UKX package | part 4: Adding the mesh to a map | part 5: Limitations
![[furryclan]](/images/furryclan.jpg)


