![[furryclan]](/images/furryclan.jpg)


Skeletal meshes. Maya to UnrealEd
Article by [furrycat].
Creating a mesh
First you need to prepare your model for export. In Maya, the model must consist of a single mesh (you may have to combine polygons to achieve this) and all vertices in the mesh must be linked to a skeleton hierarchy using Smooth Bind. Furthermore, each joint in the skeleton should have a unique name.
Unless the whole model will be animated, you should link static vertices to one of the joints and animate the other(s). The number of frames in your animation is up to you.
Here's a clock I modelled very hurriedly.
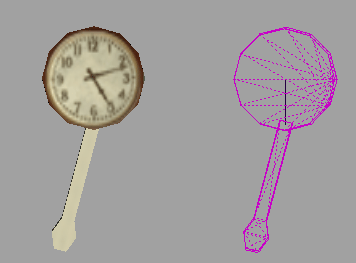
The righthand image shows the skeleton structure. Two joints are present. The topmost one has full influence over all the vertices on the clock face whereas the lower one has full influence over the pendulum's vertices. This means the lower joint can be rotated, thus "swinging" the pendulum without affecting the face.
Too bad the hands of the clock use a texture and won't be animated along with the pendulum...
You can download the clock here if you wish: clock.zip. The animation is a bit jerky and the texturing is very rough. This tutorial is about adding models to Raven Shield not modelling the best clock you can!
Jump to a section
intro | part 1: Creating a mesh | part 2: Exporting the model | part 3: Creating a UKX package | part 4: Adding the mesh to a map | part 5: Limitations